How to Make Cross Stitch
Assalaamu'allaikum.
Cross stitch, or kristik/strimin/tusuk silang in Bahasa Indonesia and Malay, is an old craft art. It's been existed for couple thousand years, and well developed in many parts of the world. This is not a surprise since making cross stitch is easy to learn, and give the stitchers not only leisure, but often profit too. Basically, making cross stitch is stitching crosses according to certain chosen pattern.
Preparation
Before start stitching, prepare your kits and materials. It is always useful to have several needles, especially if you plan to accomplish pattern that using many thread colors. This will save your time from changing threads at the same needle everytime you need to move on different color. Don't choose sharp end needle. I have Gold Eye tapestry needle, size 18, for cross-stitching. I dont know it's the best or not, but that's the brand I can get easily at nearest market in my town. Like other brands, it looks like this:
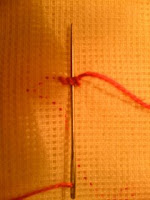
Or you can choose plastic needle, which has bigger hole. In every time, I never suggest plastic stuffs since they are not environmental friendly (for instance, in fact, our earth will need about 400 years to decompose them). However, if you like to play safe, you can choose the plastic needle. Usually, you will find notifier on its pack telling that the needle is safe for children. And it's also colourful, like this:

Better to start stitching at centre of the fabric to ensure our design fit on the fabric properly, not too wide empty space at one side while too narrow at the opposite side. On the pattern you can see the centre point by drawing imaginary line from arrow signs (printed one on horizontal grid and other one on the vertical grid), the two imaginary lines meet at the center. For fabric, you can use simple way to know the centre. First, you fold the fabric in half and "pinch" with your finger to make a small crease. Then, fold the fabric again in other half, and do the same. When you open the fabric up, you can see the creases marked the centre of your fabric. You can start stitching around that. Eventhough most stitchers start stitching close to the center, this is not always the case. You can start stitching from bottom left, middle right, or wherever on the fabric that you like best. Just make sure when you do that, your design will be finished on beautifully and you will not have problem in framing it.
Stitching
For me, to make cross stitches neatly, I prefer not to make knot by the end of the thread. Knotting the thread makes my stitches not flat (I dislike this) and cost me more time in stitching. I only left enough thread behind, and insert it between the thread while doing the back-stitching. When finish a color, insert couple centimetres of the thread at the back stitches too.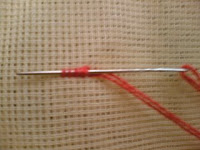
In short, there are two ways to make cross stitch. One is making full cross stitch before you go to the next cross stitch like the picture below:
 |  |
The second way is making a row or a column of half cross stitches in one direction (\\\\\), then stitch back in opposite direction (/////).
 |  |
I prefer the second way because it makes me quicker in finishing certain design and the back surface look neat. Anyway, you choose what is best for you.
Only remember to make cross stitches in one direction. This will make your design neat and flat. If you work with the same color key for different stitching area, avoid to stitch directly without cutting the thread. This will left a long tail between the two areas, and cause the back surface look messy. And it takes longer threads too. Compace these two pictures, you can tell which one is better for you.
 |  |
Final
After finish stitching the design, better to wash the finished design in cold water with soft detergent. Dry it using towel, and while it still damp, put it inside a folded soft towel (another towel, dry one) and iron it. then hang it in the mild airy room.
Wassalaam.
Photos courtesy of Sally Bassiouni, Islamic and Arabic Crossstitch.


0 comments